
Creative Seating Chart Ideas (And the Realistic Logistics of Sourcing Them)
Creative Seating Chart Ideas (And the Realistic Logistics of Sourcing Them)
When the florist delivered twenty‑four bud vases and a handful of ranunculus for the rehearsal dinner, I realized my seating chart needed more than just paper. Too many couples ask for something that looks custom but forget the day‑of logistics.
You’ll find step‑by‑step tips for each concept, how to keep water from spilling, avoid glare on acrylic, protect herbs during transport, manage champagne queues, and prevent wind from ruining fabric banners.
The ideas work for both small garden weddings and large banquet halls, offering a mix of visual impact, sourcing, budgeting, and staffing considerations. Expect to spend a few extra hours on prep compared with a simple printed chart. You’ll finish with a clear sense of which option matches your venue, guest count, and DIY comfort level.
The Bud Vase and Fresh Stem Display

A clear glass bud vase, four inches tall, cradles a single spray rose beside a handwritten name card. Set the vases on a low wooden riser so guests can read the chart from waist height.
Fill each vase with about two inches of water, then add a fresh ranunculus stem; the sturdy petals stay vibrant longer than delicate peonies.
Secure the card with a small binder clip to keep it upright and prevent the vase from tipping.
Buy bulk bud vases from a discount glass supplier for $1‑$2 each, or repurpose tiny perfume bottles found at thrift stores for under $0.50 per piece.
Choose ranunculus or spray roses at $2‑$3 per stem; they hold up well in warm weather and cost less than specialty blooms.
Arrange vases in rows that match the venue’s width; a 100‑guest room needs roughly 12‑15 vases per row to avoid overcrowding.
Line each vase’s base with a half‑inch of floral foam soaked in water to reduce spills and keep stems hydrated during transport.
Forgetting to top off water after a few hours can wilt the flowers; check levels every two hours on the day of the event.
After the ceremony, rinse the vases and reuse them for future parties, cutting the per‑event cost dramatically.
Place a small zip‑top bag of water beads under each vase to keep stems hydrated during transport.
Hanging Acrylic Panels on Metal Frames

Suspend a 12‑inch clear acrylic sheet from a brushed‑nickel metal frame with two S‑hooks.
Thread the hooks through pre‑drilled holes in the frame and hang the panel on a sturdy ceiling beam or a decorative wall bracket.
Choose matte black vinyl lettering for the names; the dark hue stays legible against the bright sheet even when venue lighting shifts.
For outdoor weddings, position the panels where they catch only diffused light; direct afternoon sun will cause the clear acrylic to reflect and blur the text.
If fingerprints or glare become a problem, swap the clear sheet for a frosted acrylic panel of the same size.
Frosted acrylic diffuses light, reduces reflections, and hides smudges, making it a safer read for most lighting conditions.
Run a microfiber cloth lightly dampened with a 50/50 water‑isopropyl solution across the surface before the event, then finish with an anti‑static spray to keep dust at bay.
A common mistake is anchoring the panel with thin plastic hooks that bend under weight; metal S‑hooks rated for at least 5 lb prevent sagging.
DIY‑ers can purchase acrylic and frames from a home‑improvement store and cut the lettering with a vinyl cutter; a sign‑shop can laser‑etch the names for a modest fee.
Add a removable silicone edge guard to protect the panel during transport.
Potted Herbs and Miniature Terrariums

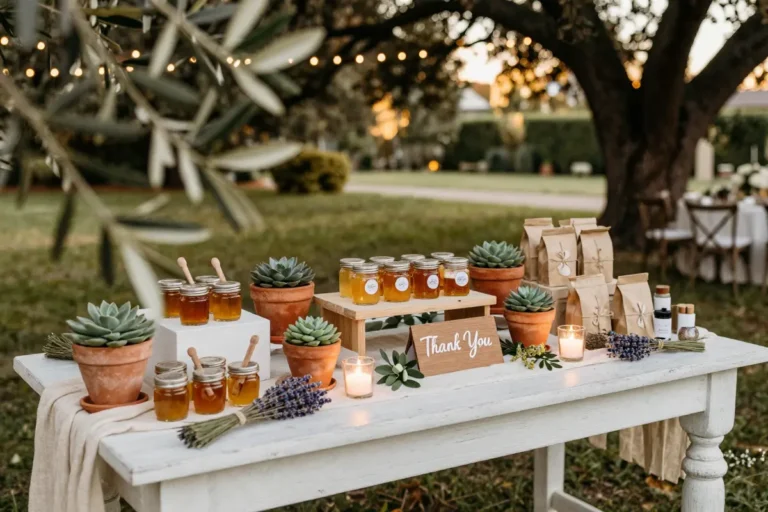
A 4‑inch terracotta pot filled with fresh rosemary makes a charming escort card and favor.
Place the pot on a small wooden garden marker and write the guest’s name with a fine‑point permanent marker; the dark wood shows the ink clearly.
Choose starter plants from a local nursery; mint, thyme, or tiny succulents cost $3‑$5 each in bulk, keeping the per‑guest expense low.
Start by potting the herbs in lightweight, pre‑drained containers; this removes excess moisture that could stain a reception table.
Line the display board with a sheet of parchment paper before arranging the pots.
For a wedding of 80 guests, group the markers in rows of eight; for larger gatherings, use 5‑inch pots to reduce the number of rows while keeping the visual balance.
Wrap each pot in a clear cellophane bag and secure it with a small paper clip; the bag catches any stray soil and makes placement on the chart board effortless.
The main drawback is the weight of live soil; transport the pots in a sturdy box with a rubber mat to prevent tipping.
After the event, the herbs can be replanted or kept as table décor, extending their usefulness. If a fully live setup feels too risky, substitute dried lavender bundles in the same pots; they look similar but eliminate the mess and weight concerns.
Linen and Canvas Fabric Banners
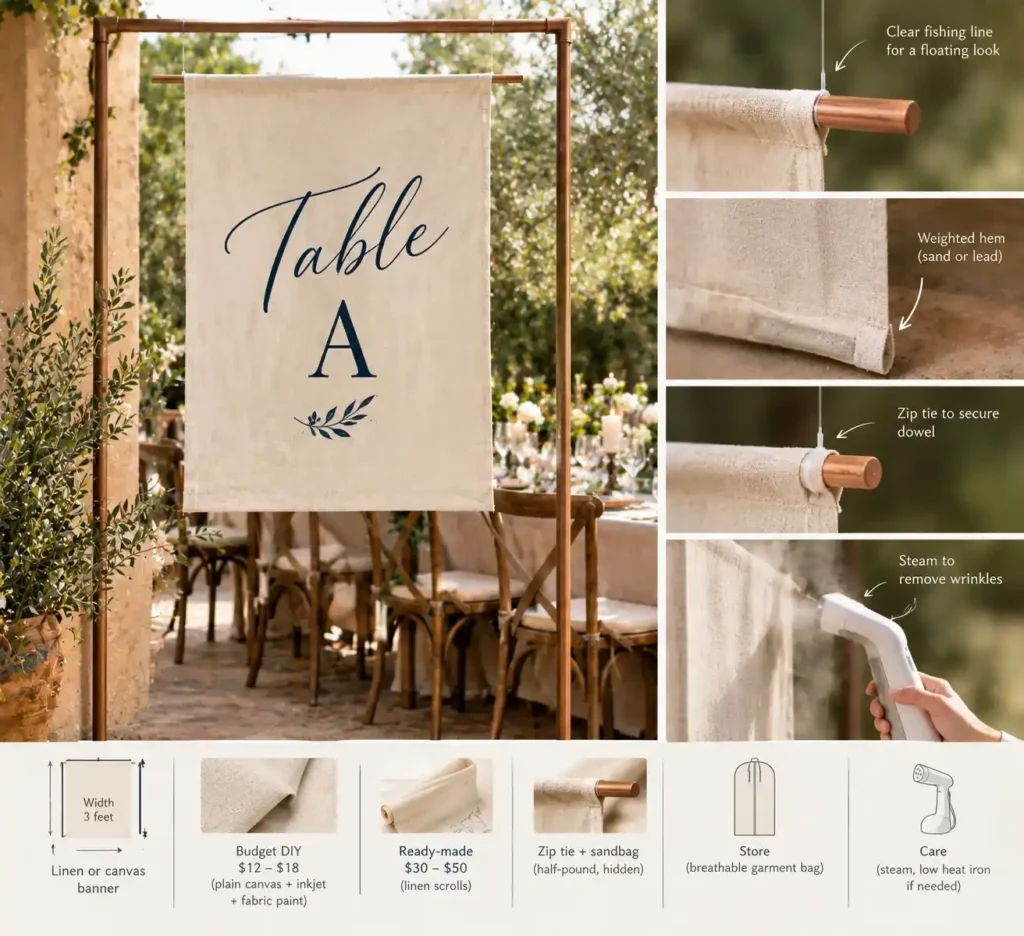
A 3‑foot‑wide linen scroll hangs from a brushed‑copper frame, the word “Table A” hand‑lettered in deep navy ink.
Printed or hand‑lettered fabric scrolls work well for rustic or garden‑themed receptions. Suspend each banner on a thin wooden dowel or a sleek copper rod and attach the rod to the ceiling with clear fishing line for an invisible float.
Wrinkles appear after transport; a compact hand steamer removes them in seconds. Quick tip: steam the back side while the banner hangs, then smooth the front with a clean hand.
Outdoor breezes will catch the fabric easily; the scroll can flap or fold over itself unless the bottom edge is weighted. Sew a thin strip of canvas filled with sand or clip small lead weights to the hem.
For upkeep, roll the banner loosely and store it in a breathable garment bag. Iron on low heat only if creases remain after steaming.
DIY‑friendly options include buying plain canvas for $12‑$18 and printing with a home inkjet, then adding hand‑lettered details with fabric paint. Ready‑made linen scrolls from specialty shops run $30‑$50 each.
Secure each dowel by looping a 2‑inch zip tie around its ends and clipping the ties to a half‑pound sandbag hidden behind the nearest table leg.
Vintage Mirrors with Paint Pen Lettering

Mirror glass surfaces reflect everything in front of them, which can completely obscure the written text if positioned opposite busy patterns or bright background lights.
To avoid that, hunt vintage frames at local thrift shops for $20‑$80 or on Etsy, where ornate options run $50‑$150.
Clean the glass, then write table numbers with oil‑based paint pens or liquid chalk pens that cost $8‑$15 each; the pigment stays opaque on reflective surfaces.
Hang the mirror on a matte wall and set it at waist height, angling the top edge toward the entrance so guests read the numbers without squinting.
Keep spotlights and patterned backdrops at least three feet behind the mirror; a simple LED strip on the lower edge adds gentle back‑lighting without glare.
If the mirror’s shine still steals focus, a solid‑wood board painted with chalk paint serves the same purpose without reflection issues.
For a budget‑friendly version, buy a plain thrifted mirror and use inexpensive paint pens; a custom‑ordered mirrored sign can exceed $200.
DIY the lettering yourself, or order a pre‑lettered sign from a party vendor for a hands‑off approach. Attach a removable Velcro strip to the back so you can fine‑tune the tilt on the day of the event.
Tension-Wire Grid with Deckled Paper Cards
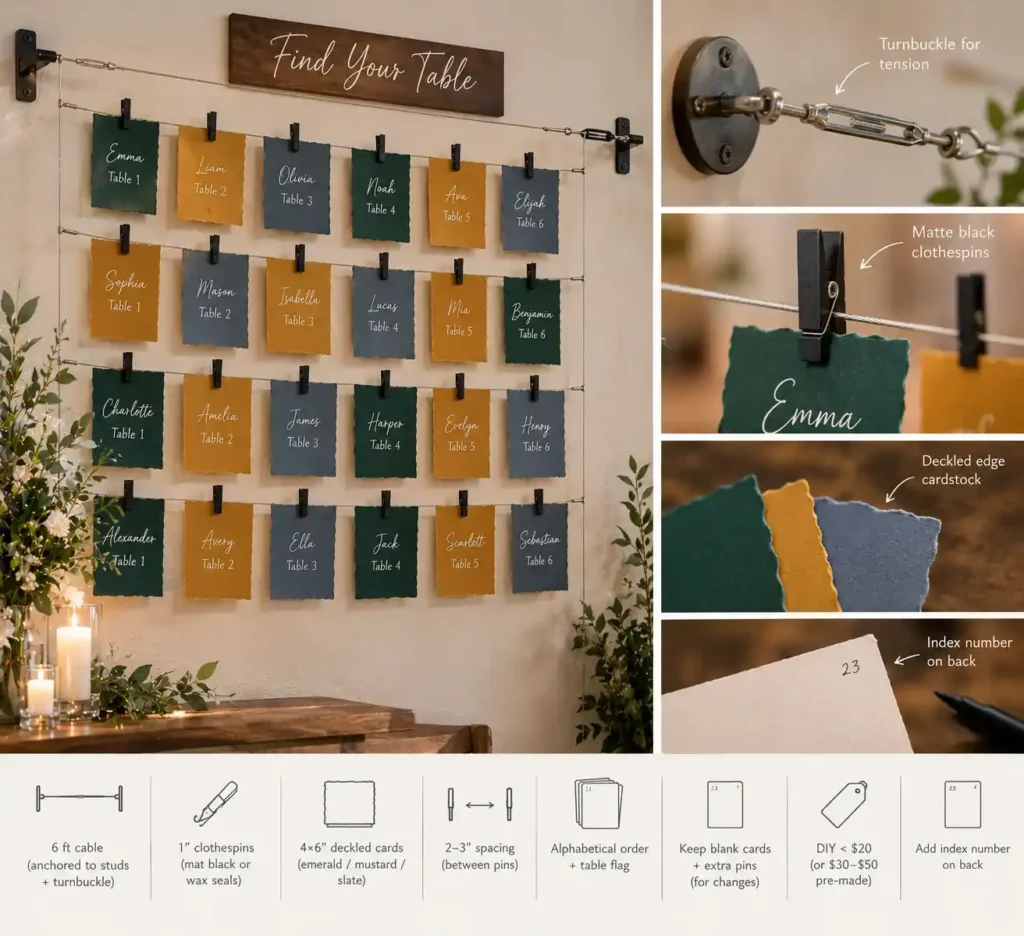
Clip miniature clothespins onto a tension‑wire grid to hold deckled paper cards. Start with a 6‑foot photo‑hanging cable, anchor it at two wall studs, and pull it tight with a turnbuckle.
Paint 1‑inch wooden clothespins matte black for a sleek look, or use wax seals for a vintage touch.
Cut 4×6‑inch deckled‑edge cardstock in bold color‑blocked shades: emerald for the bride’s table, mustard for the family side, slate for friends.
Space the pins 2‑3 inches apart; this spacing keeps names legible and fits most venue walls. Place each guest’s card on a pin in alphabetical order, then attach a small paper flag indicating the table number.
Individually clipping paper cards to wire mesh is exceptionally tedious to alphabetize on‑site and offers no easy way to adjust for last‑minute RSVP cancellations without manually shifting the entire grid.
Keep a stack of blank cards and extra pins handy; when a name drops out, swap the canceled card with a blank and slide the surrounding cards into the gap, avoiding a full re‑order.
DIY this set for under $20 using a picture‑rail cable and S‑hooks; a pre‑made tension‑wire display runs $30‑$50. For a 50‑guest list, break the line into two 3‑foot sections to prevent overcrowding.
Write a tiny index number on the back of each card so you can locate and replace a name in seconds.
Custom Seed Packets on a Pegboard
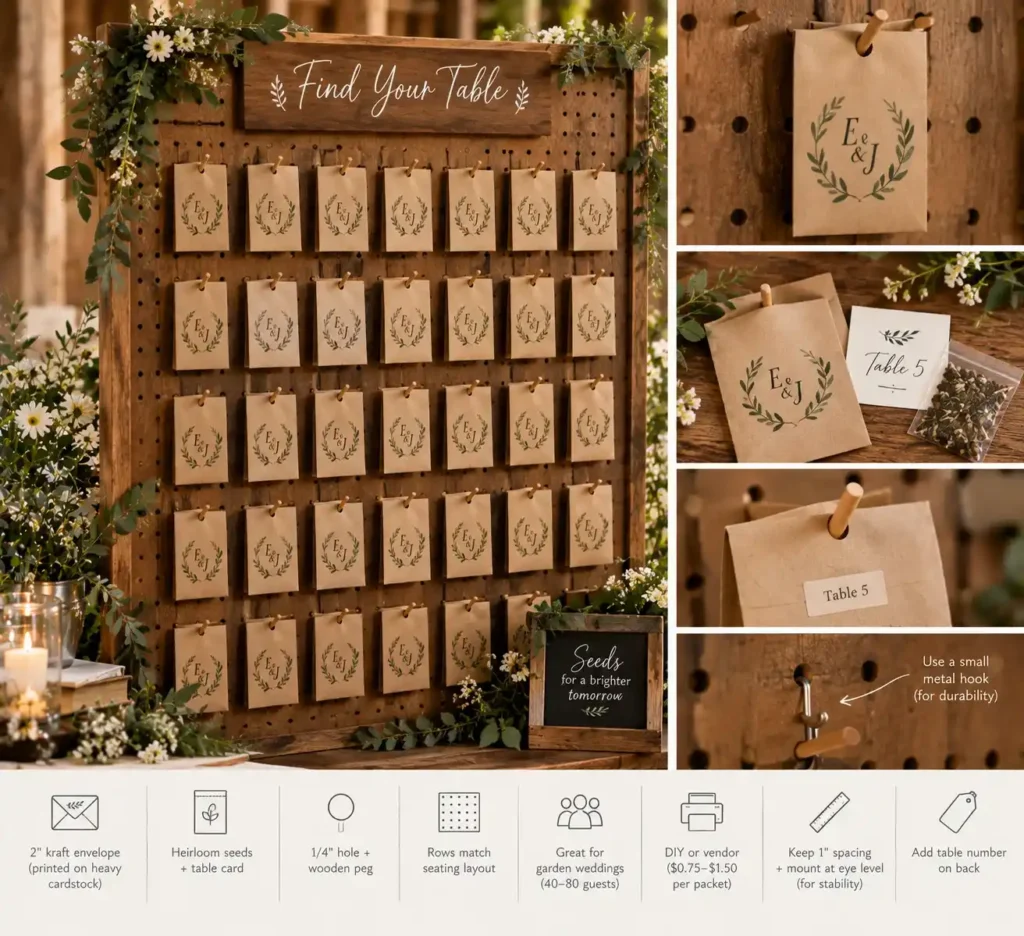
A 2‑inch kraft paper envelope printed with the couple’s monogram hangs from a wooden peg on a reclaimed‑barn pegboard.
The envelope holds a handful of heirloom seeds and a small card that lists the assigned table.
Print the envelope design on heavy cardstock (⅜‑inch) to keep it flat and avoid the flimsy feel of standard seed paper.
Cut a single ¼‑inch hole at the top, insert a thin wooden peg, and arrange the envelopes in rows that match the seating layout.
This setup works well for garden‑themed weddings with 40‑80 guests, where guests can admire the natural detail while finding their seat.
DIY the envelopes with a home printer and a cutting mat; vendors charge $0.75‑$1.50 per packet for pre‑printed sets, which saves time if you lack a cutting tool.
A quick tip: use a ruler to space the holes evenly, then attach the pegboard to a sturdy wall at eye level to prevent wobble.
Thin paper envelopes tear easily when guests pull them from tight hooks, risking spilled seeds and damaged tags.
To reduce stress, space the pegs at least an inch apart and use a small metal hook rather than a tight loop.
Add a small label with the table number on the back of each envelope to keep the chart readable even if a seed spills.
The Multi-Frame Gallery Wall Grid
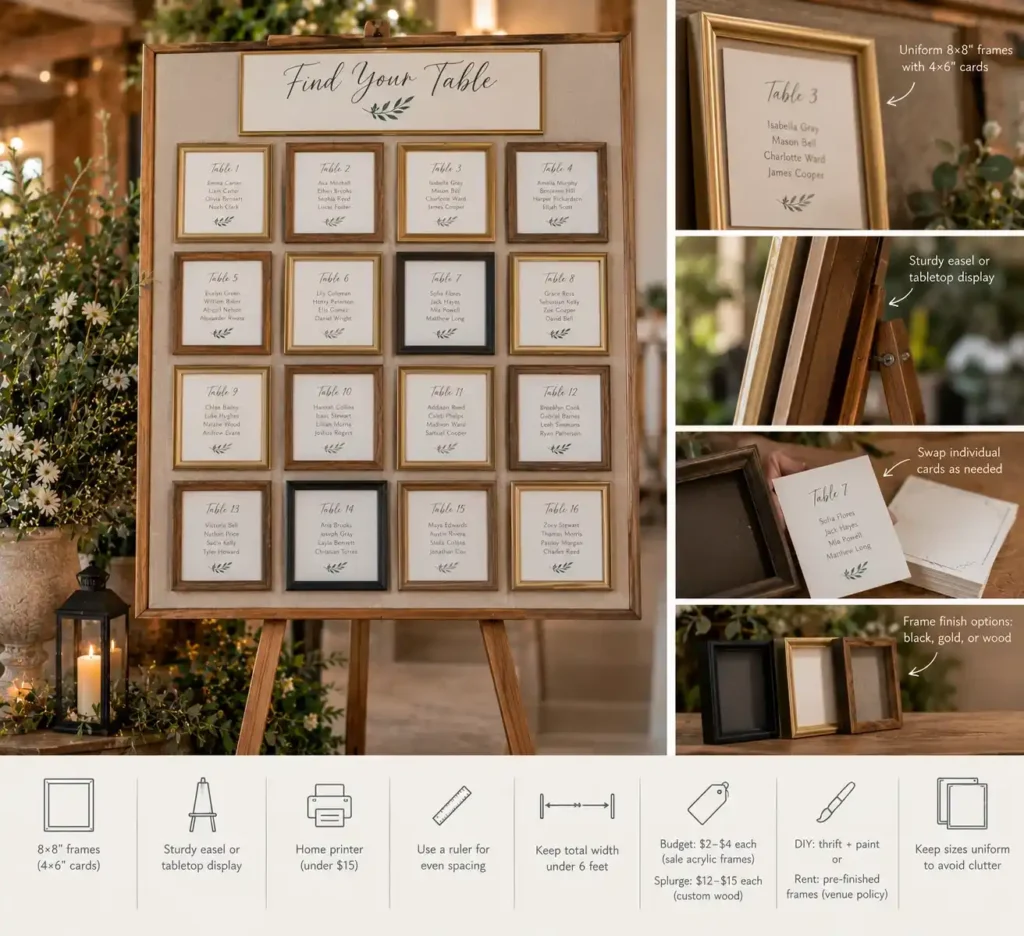
A single 24‑inch poster forces a full reprint whenever an RSVP shifts, while a grid of 8‑by‑8‑inch frames lets you swap just the affected name.
Lay the frames on a sturdy easel or a low tabletop so the whole chart stays at eye level. Choose frames in the same color or finish mat black, brushed gold, or reclaimed wood to keep the display cohesive.
Print each guest’s name on 4‑by‑6‑inch cardstock; a simple home printer handles the batch for under $15. Insert the cards into the frames and arrange them in rows that match your table layout.
A quick tip: use a thin ruler to mark equal spacing on the backing board before placing frames; this prevents a haphazard look.
The grid works best when the overall width stays under 6 feet, ensuring it fits most reception halls without blocking traffic.
For a budget version, buy a bulk pack of 12‑inch acrylic frames on sale for $2‑$4 each; a splurge option is custom‑etched wooden frames at $12‑$15 per piece.
DIY‑savvy planners can repurpose thrift‑store frames and paint them to match the theme, while venues with strict décor policies may require pre‑finished frames from a rental shop.
Remember, too many varied sizes can tip the display from curated to cluttered, so keep the frame dimensions uniform.
Library Card Catalogs and Slotted Wooden Blocks
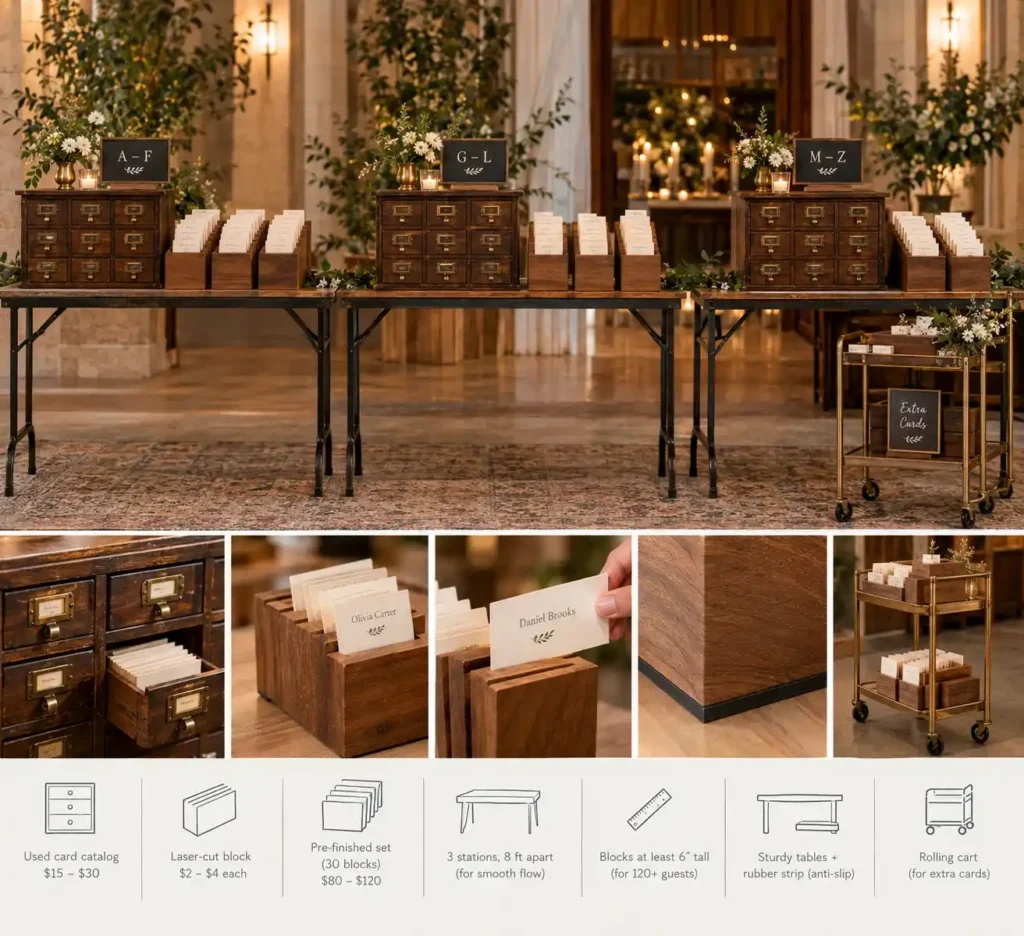
Pull a vintage library card catalog drawer from a prop house and pair it with custom‑milled wooden blocks that feature horizontal slots for each guest’s name card.
Alphabetize the cards before the event; with over 100 guests, the order prevents line‑ups that can stretch five minutes or more.
Set three catalog stations on sturdy folding tables spaced eight feet apart, allowing guests to move laterally rather than crowd a single entry point.
This layout works best for large, formal weddings or corporate galas where a classic, tactile feel matches the décor.
Choose blocks that are at least six inches tall for a 120‑person list; shorter blocks will require a second tier and double the handling time.
The wooden blocks add weight, so ensure the folding tables are sturdy; wobbling surfaces can cause cards to shift.
Attach a thin rubber strip to the bottom of each block to keep cards from slipping when guests pull them out.
- Used card catalog: $15‑$30
- Laser‑cut block: $2‑$4 each
- Pre‑finished set (30 blocks): $80‑$120
DIY‑friendly: locate a used card catalog at a thrift store for $15‑$30, then have a local woodshop laser‑cut the slots for $2‑$4 per block. For a no‑DIY route, pre‑finished block sets run $80‑$120 for a full set of 30.
Place a small rolling cart with a spare set of blocks at the far end of the room so guests can finish choosing without crowding the entrance.
Wax-Sealed Escort Card Envelopes

A miniature ivory envelope sealed with a deep burgundy wax stamp instantly feels vintage.
Lay the envelopes flat on a reclaimed wood table or pin them to a pegboard for easy guest navigation.
For a guest list of 30‑50, melt a small batch of sealing wax in a double‑boiler, dip a custom brass stamp, and press each envelope.
The process looks elegant but quickly becomes messy; drips can splatter the table, and stamps may lose definition if the wax cools unevenly.
A quick tip: pour the melted wax onto a silicone mat first, then tap the stamp onto the droplet before sliding it onto the envelope; this keeps the work surface clean and yields consistent impressions.
If the list exceeds 80 names, switch to self‑adhesive wax‑seal stickers. They mimic the look of hot wax, attach in seconds, and eliminate the heat‑handling hazard.
Stock‑pattern stickers cost a fraction of a custom brass stamp, which can run several times higher in price and require ordering lead time.
For couples on a tighter budget, purchase a set of pre‑stamped wax‑seal stickers from a craft store and add a handwritten initial in gold ink for a personalized touch.
When the venue is outdoors, or the table is prone to wind, the adhesive backs prevent the seals from slipping off.
For indoor, formal receptions where the tactile experience matters, the hot‑wax method adds a memorable detail without breaking the bank.
Choose the method that matches the size of your guest list and the amount of time you can devote to assembly.
Pick Your Favorite Seating Chart
Take a quick inventory of your venue, budget, and staffing bandwidth. If you have a small outdoor garden, potted herbs or seed‑packet pegboards add charm without heavy equipment. For larger halls, a tension‑wire grid or multi‑frame gallery wall offers easy swaps when RSVPs change.
Remember to test lighting on mirrored or acrylic displays and keep a backup set of cards for any last‑minute cancellations. Choose one idea that feels doable, gather the supplies, and give yourself a trial run before the big day. Save this guide for your next planning session and share it with anyone hunting for a seating chart that actually works.
Frequently Asked Questions
What are some creative ideas for a seating chart?
Creative options include living displays like potted herb escort cards, interactive elements like a champagne wall with custom glass tags, or minimalist tactile approaches using hand-steamed linen banners and deckled-edge paper secured with custom wax seals.
Should seating charts be in alphabetical order or by table number?
For guest lists over 75 people, organize names alphabetically by last name rather than grouping them by table number. Alphabetical layouts allow guests to find their names in under ten seconds, preventing long bottlenecks at the entrance.
How do you handle last-minute RSVP changes on a printed seating chart?
Use modular designs like individual framed cards for each table, individual hanging tags, or pegboard systems. These options allow you to reprint single elements cheap and fast, avoiding the need to scrap and reprint an entire large-format board.
What is the standard font size for a legible seating chart?
For large display boards, individual guest names should be at least 24-point font (roughly 0.25 inches tall), and table headers should be 36-point or larger. Avoid overly ornate calligraphy fonts that become illegible in dim reception lighting.