

18 Wedding Arch Ideas: The Honest Setup and Practicality Guide
18 Wedding Arch Ideas: The Honest Setup and Practicality Guide
When the venue coordinator handed us a 20‑foot empty span and said, “We need something that says ‘wow’ before the vows,” my mind raced through endless Pinterest boards. I’ve spent hours scrolling, only to find arches that either topple in a breeze or cost a small fortune.
Here are 18 arches, from a lightweight copper pipe frame to a living‑tree backdrop that eliminates rental fees, to a neon‑lit sign that shines at dusk. DIY brides and seasoned planners alike will get clear notes on stability, transport, and cost. After reading, you’ll pick a design that holds up to wind, fits the venue, and matches your budget.
The Minimalist Copper Frame

Piece-spotlight: a copper pipe arch with a brushed finish anchors the ceremony and sets an industrial tone. The frame is lightweight and cheap, but its low mass makes it incredibly prone to tipping over when styled outdoors. Secure the base plates with hidden sandbags or heavy stone planters wrapped in greenery; the weight stays out of sight while keeping the arch steady.
This look works best for intimate weddings of 30‑60 guests who favor a minimalist vibe; it flatters all body types because the arch frames the couple rather than the crowd. A splurge option adds a powder‑coated finish and custom steel footings, while a budget DIY uses standard plumbing pipe and wooden base plates. Renting a pre‑built unit saves time and avoids the need for welding.
- affordable
- lightweight
- prone to tipping
- limited height
hide sandbags in planters for invisible stability
The Grounded Semi-Circle

A low half-moon of wood or steel hugs the ground and cradles the couple instead of towering over them. Because the center of gravity sits close to the earth, this is one of the most wind-friendly shapes on the list, and it never blocks a lake, mountain, or sunset view behind the vows.
The weak point is the two ends, where the curve meets the ground. On soft grass, they sink or kick outward, so set each foot on a flat paver or a plywood pad and drive a tent stake through the base bracket. On a slope, shim the low side until a level reads true before adding any flowers.
This shape suits open-air ceremonies of 40‑100 guests where the scenery should stay visible, and its modest height works for any couple.
A budget DIY bends ¾‑inch EMT conduit on a rented bender and wraps it in greenery for roughly $60‑$120; a splurge option commissions a powder‑coated steel ring with a custom floral crescent. Renting is worth it if you have no bending tools, since a kinked curve looks sloppy up close.
- keeps scenic views open
- very wind‑stable
- ends sink in soft turf
- less dramatic from the back rows
cluster the heaviest flowers at the two base ends to add weight right where the arch needs it
sprinkler lines and soft ground can shift the ends overnight, so walk the setup spot the day before
The Double-Hoop Circular Arch

Two gleaming steel hoops stand side‑by‑side, forming a seamless circular tunnel for the ceremony.
The parallel rings add depth without extra height, so guests see the couple from every angle. The frames are too wide for a sedan, so they travel in sections on a truck and are bolted together on site; otherwise, they can warp under their own weight.
Distribute bouquets and greenery in three equal sections around each hoop, following the rule of thirds, to keep the curve balanced.
This arch shines in spring or summer when fresh blooms are plentiful; in winter, swap flowers for pine boughs. Because the metal is heavy and the bolts need precise alignment, renting a pre‑built unit is safer than a DIY build.
- dramatic visual impact
- creates 3‑D depth
- requires truck transport
- needs on‑site assembly
place flowers in three equal sections around each hoop to follow the rule of thirds
uneven ground can make the arch wobble and roll
The Driftwood Teepee

A few driftwood poles lie on the shoreline, ready to become a teepee arch. Soft sand offers poor anchor support, so a two‑post frame will wobble; a third leg at the back creates a stable triangle.
Drive each pole into a sand‑filled bucket, then lash them with ¾‑inch sisal rope using a clove‑hitch loop at each joint.
The rope tightens as the tide shifts, keeping the structure steady without zip‑ties. This works for intimate beach ceremonies of up to 30 guests, especially boho‑styled couples.
DIY is possible with a few poles and rope, but renting a pre‑built teepee saves setup time.
- natural driftwood
- beach vibe
- needs third leg
- rope may loosen
Fill a bucket half with sand to make a removable anchor
Add a strand of sea‑glass beads to the rope for a subtle sparkle.
The Reclaimed Wooden Barn Doors

Two weathered barn doors stand open like a gate, their chipped paint and iron hardware giving the ceremony instant character. The look is rustic, tactile, and photographs beautifully against a field or a barn wall.
The catch is weight. Each door can run 80‑150 lb, and a freestanding door is a tipping hazard in even a mild gust. Never lean the doors against a tree or wall as a shortcut.
Build a simple rear brace instead: a 2×4 A‑frame leg bolted to the back of each door, hidden behind greenery, with a sandbag on each foot. Bring two helpers and a truck, because these do not fit in a sedan.
- instant rustic character
- wide, solid backdrop
- very heavy to move
- needs rear bracing
bolt the A‑frame legs on before delivery so setup takes minutes, not an hour
old painted doors may contain lead; test them and seal the surface before guests lean in for photos
- DIY with new doors: $120‑$250
- Salvage or rental: $300‑$600
The Birch Branch Triangle

Secure the dry birch branches with heavy‑duty wood screws before joining the three legs of the A‑frame. The triangular shape distributes load evenly, so wind pushes on each side rather than bending a single beam. A common mistake is using wet, heavy logs; they flex and let the arch sag under floral weight.
Instead, cure the branches for at least two weeks, then pre‑drill pilot holes and screw them together; avoid hot glue or wire, which slip when humidity changes.
- organic look
- wind‑resistant
- sagging with green logs
- glue fails when humid
pre‑drill holes to prevent splitting
heavy bouquets can overload a dry‑only frame
Add a single 12‑inch sandbag at each base to lock the frame on uneven grass.
The Living Tree Backdrop
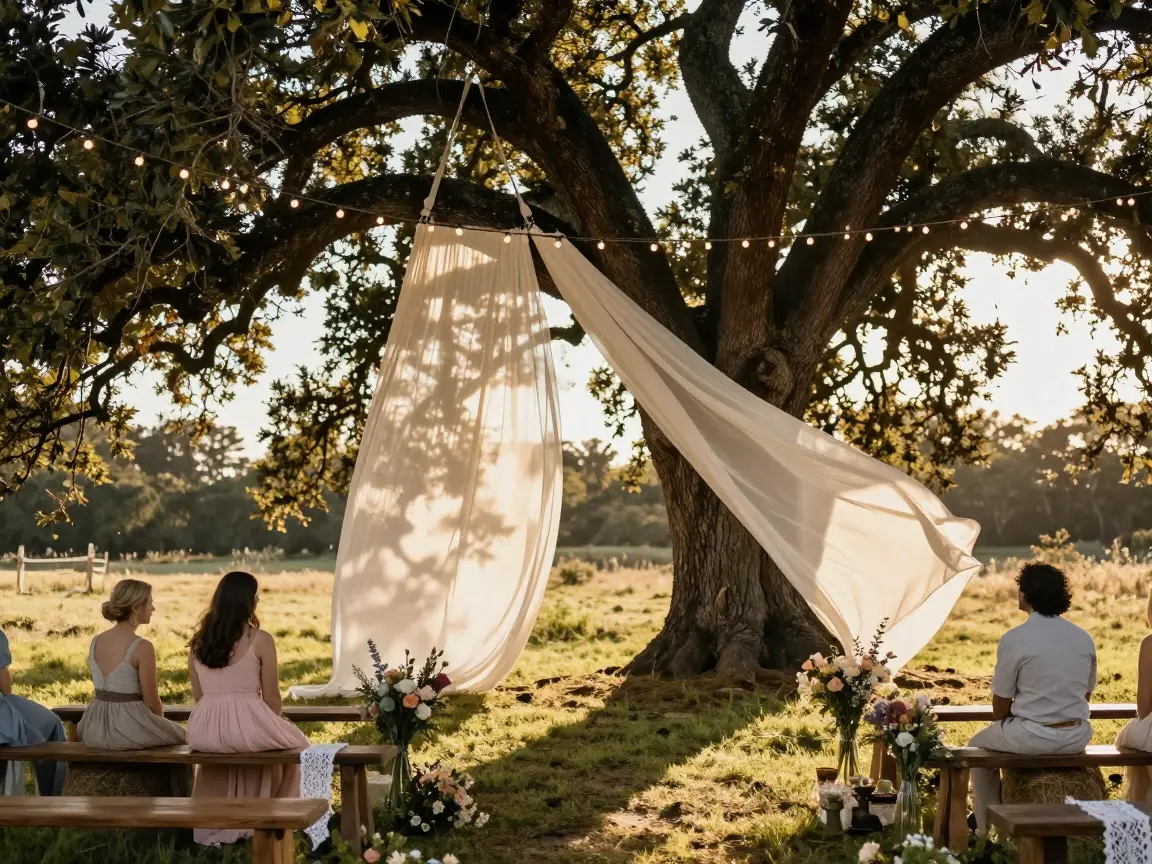
A 25‑foot oak stands in the meadow, its trunk already framing the aisle. The tree becomes the arch, so you skip rental fees and frame costs. Secure a soft linen drape with padded ratchet straps; never nail into bark.
The trade‑off is a fixed location, which limits lighting, guest flow, and rain‑plan options. If the tree isn’t usable, rent a portable wooden arch, or DIY a pine frame, hiring a decorator saves time. Best for outdoor weddings of 50‑100 guests with a rustic or boho vibe.
Tall couples benefit from the vertical line; short pairs can add a low garland for balance. Tie a string of warm LED bulbs to the top branch for evening glow.
- zero rental cost
- natural backdrop
- fixed location limits layout
- weather backup needed
Use padded ratchet straps with fabric sleeves to protect bark
The Monochromatic Ombre Floral Arch

A sweeping arch of white garden roses that fade into deep blush at the apex creates a dramatic, single‑color cascade.
The look needs a professional florist, hundreds of fresh stems, and a block of oasis foam to hold them. Expect a price tag in the several‑thousand‑dollar range and a crew to dispose of the foam after the ceremony.
For tighter budgets, swap fresh roses for silk buds and use a reusable wire frame; the effect softens but stays on theme.
This design shines at large, formal weddings where a curvy bride wants a bold backdrop. DIY works only with floral‑construction experience; otherwise, hiring a florist saves time and waste.
- dramatic visual impact
- cohesive color story
- high material cost
- single‑use foam waste
floral foam is single‑use plastic and not recyclable
The Acrylic Pillars with Floating Florals

A clear acrylic column, six feet tall, anchors the ceremony and lets guests see the garden beyond. The transparent pillar holds a “floating” bouquet of white peonies, so the arch feels light and modern. It works best for spring‑summer weddings with up to eighty guests, when sunlight highlights the glass.
The design pairs nicely with a sleek, column‑silhouette dress, letting the bride’s shape stand out without visual clutter.
- contemporary vibe
- sleek backdrop
- scratches easily during transport
- shows dust and fingerprints in bright sun
heavy sandbags required inside each hollow pillar for stability
wipe the acrylic with a dry microfiber cloth and a mist of water before the ceremony to remove fingerprints
Store the pillars in padded boxes after the day. Place a sandbag at the base of each pillar the night before to ensure they stay upright.
The Asymmetrical Broken Arch

One side rises tall while the other stops short, leaving a deliberate gap where the curve should close. The “broken” shape reads as modern and editorial, and it pulls the eye toward the couple instead of the structure itself.
Uneven height means uneven stress. The tall side acts like a sail and wants to lean into the gap, so put most of the ballast there: a steel base plate with two sandbags or a concrete paver hidden under foliage.
Keep the florals bottom-heavy on the short side and light at the top of the tall side so the weight stays low.
- editorial, modern look
- open gap keeps the couple visible
- top‑heavy on the tall side
- tricky to build at home
do a quick wind test by pushing the tall side by hand before any flowers go on
unbalanced frames can twist on uneven ground, so level both bases separately
The Potted Pampas Grass Crescent
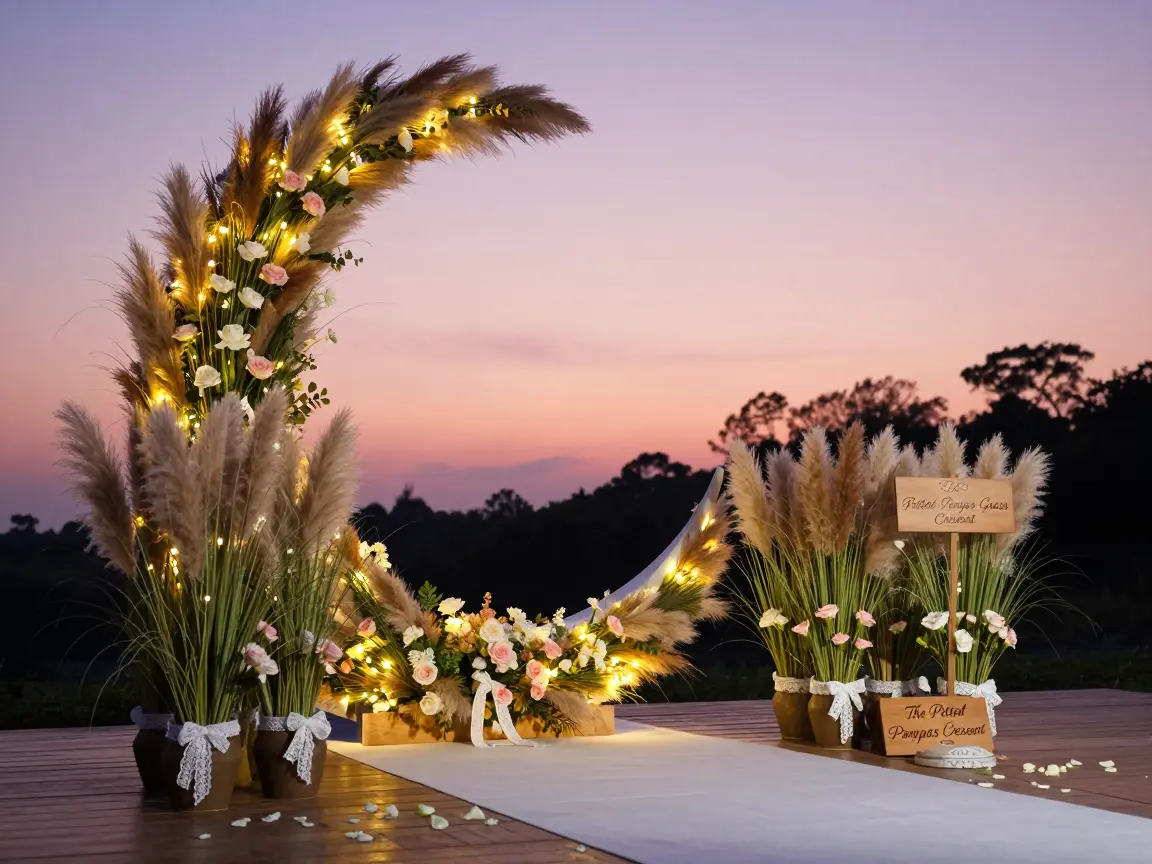
Tall terracotta pots hold feathery pampas plumes in a sweeping crescent around the couple, giving a soft, boho frame with no hard structure at all. Because the pots are the base, the whole piece can be rearranged in minutes to fit any aisle width.
Pampas is light and catches the wind, so the pots must carry the stability. Fill each one with sand or gravel up to two inches below the rim, then push the stems into floral wire or a block of dry foam.
Dried pampas also sheds, so a light mist of unscented hairspray the night before cuts down on fluff on your dress and suit. Keep it away from candles, since dried plumes burn quickly.
- easy to rearrange
- soft boho texture
- sheds fluff
- plumes sway in wind
fill pots with sand, not soil, for cheap weight that does not spill during transport
pampas can trigger allergies, so choose faux plumes if guests or the couple are sensitive
- Faux pampas DIY: $60‑$140
- Real dried, large pots: $200‑$450
The Woven Macrame Screen on Brass

The brass frame stands at the front of the loft, its slim profile barely visible behind the macramé weave. The dense knotting catches any breeze, turning the backdrop into a moving sail that pulls attention from the vows. It works best in indoor industrial lofts or historic chapels with low foot traffic and a guest list under 120.
The arch can be reused for future events if stored flat in a garment bag; it needs gentle shaking to remove dust before folding. DIY kits exist, but professional macramé saves time and ensures even tension.
- boho texture
- fits small gatherings
- wind‑sensitive
- needs sturdy floor
Anchor bottom corners to two 15‑lb terracotta pots for stability
Heavy pots can dent hardwood; place rubber pads underneath
The Literary Stacked Book Arch

Vintage hardcovers form the base, supporting a pine lintel. A flat plywood sheet prevents shifting; hundreds of books add weight. Tip: run a level on each tier before adding the next layer.
Best for intimate indoor venues like libraries, serving up to 30 guests; height stays under 6 ft, so all body types fit. Splurge: marble beam and antique leather‑bound books; budget: donated library books and a $30‑$50 pine lintel. The trade‑off is intense setup: each book must be leveled, and the whole arch can weigh 150 lb.
Couples who love reading and want a personal touch love this look. DIY works with three strong helpers; otherwise, hire a prop shop for safety. Secure the lintel with two L‑brackets to stop wobble.
- budget‑friendly look
- personal literary vibe
- time‑intensive setup
- heavy lifting required
- Materials: vintage hardcovers, plywood, pine lintel
- Weight: ~150 lb
- Ideal venue: indoor library or historic hall
- Lay plywood base
- Stack leveled books
- Place lintel on top
The Wrought-Iron Garden Gate

A dark, weathered arch of wrought‑iron frames a garden gate, its arches echoing old stone bridges.
Put potted star jasmine or English ivy at the corners; vines climb without touching the metal. The iron weighs about 150 lb per foot, so place it on a stone slab or concrete, never on turf.
If weight is a deal‑breaker, use a painted wood gate and drape a faux‑vine garland for the same shape.
Tall, slender couples and 50‑to‑80 guest evening ceremonies get the most drama from this arch. Secure each pot with a zip tie and hide the knot in a ribbon bow.
- romantic vintage look
- sturdy silhouette
- extremely heavy
- needs stone base
Wrap each pot in a wire cage before attaching to the arch
On grass the arch will sink or tilt dangerously
The Neon Sign Over Greenery

Slide a custom neon family name sign onto a thin steel rod fixed to a dense boxwood hedge. The sign must plug into an outlet or a silent battery pack hidden behind a bench, which is hard to conceal in open fields. Neon shines at dusk or during indoor ceremonies, but midday sun washes it out.
If power hiding isn’t possible, use a brushed‑aluminum monogram plaque instead. This works best for medium weddings of 80‑120 guests in spring or fall. A hand‑crafted neon is a splurge; an LED‑tube replica from a hardware store is budget‑friendly.
- dusk glow
- matches modern aesthetic
- needs visible power source
- washes out in midday sun
Battery packs can overheat in hot weather; keep them shaded
Mount the neon on a detachable bracket so you can reposition it for optimal lighting
The Hexagonal Wooden Frame
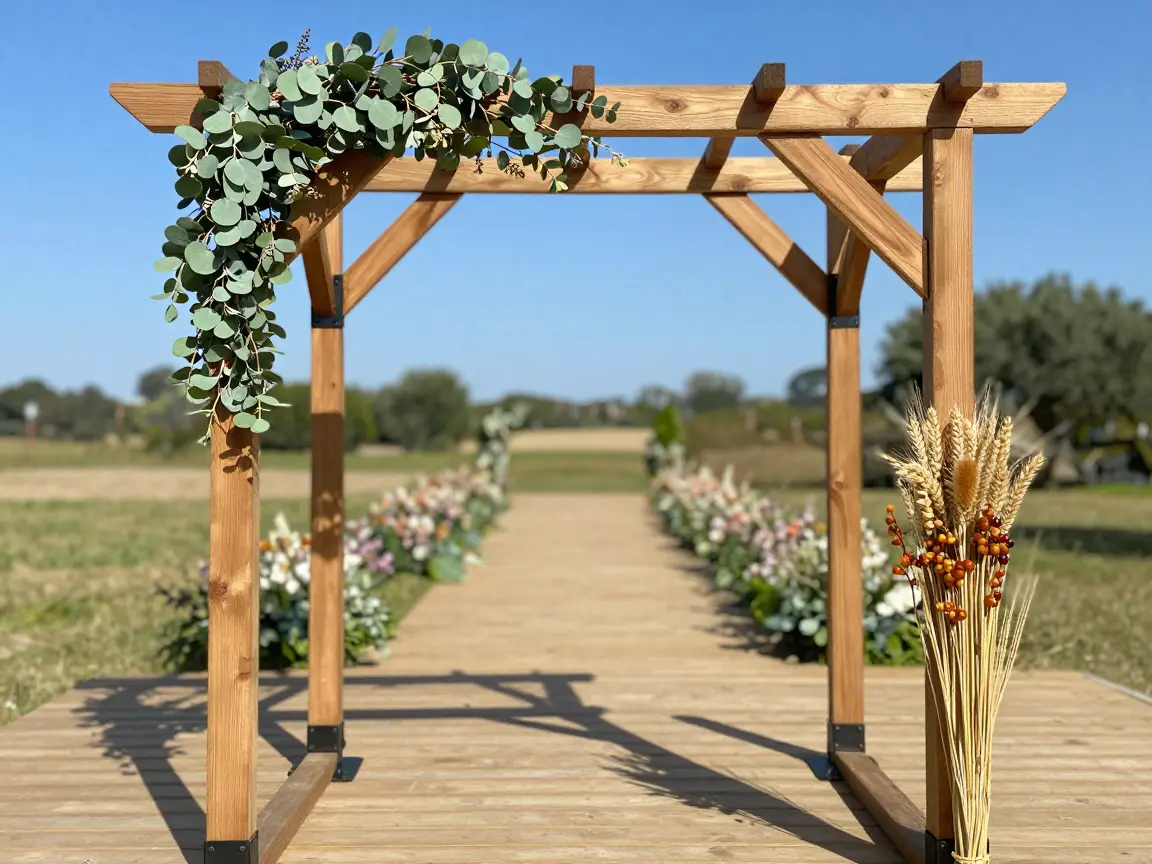
A six‑sided wooden frame sits at the ceremony entrance, its crisp lines framing the aisle.
The joints must be reinforced with heavy‑duty metal brackets; without them, the leverage of the angles will make the arch wobble when loaded with flowers.
Place foliage on one top corner and a small burst on the opposite bottom corner; the asymmetry preserves the geometric silhouette and reduces strain.
Spring weddings benefit from light eucalyptus, while autumn ceremonies look natural with dried wheat and amber berries.
If you lack a workshop, buying a pre‑finished hex arch or hiring a carpenter saves time and avoids wobble risk.
Secure the base with L‑shaped brackets before attaching any flowers
- clean geometric look
- simple drape attachment
- needs metal bracing
- unstable with heavy bouquets
The Olive Branch & Herb Arch
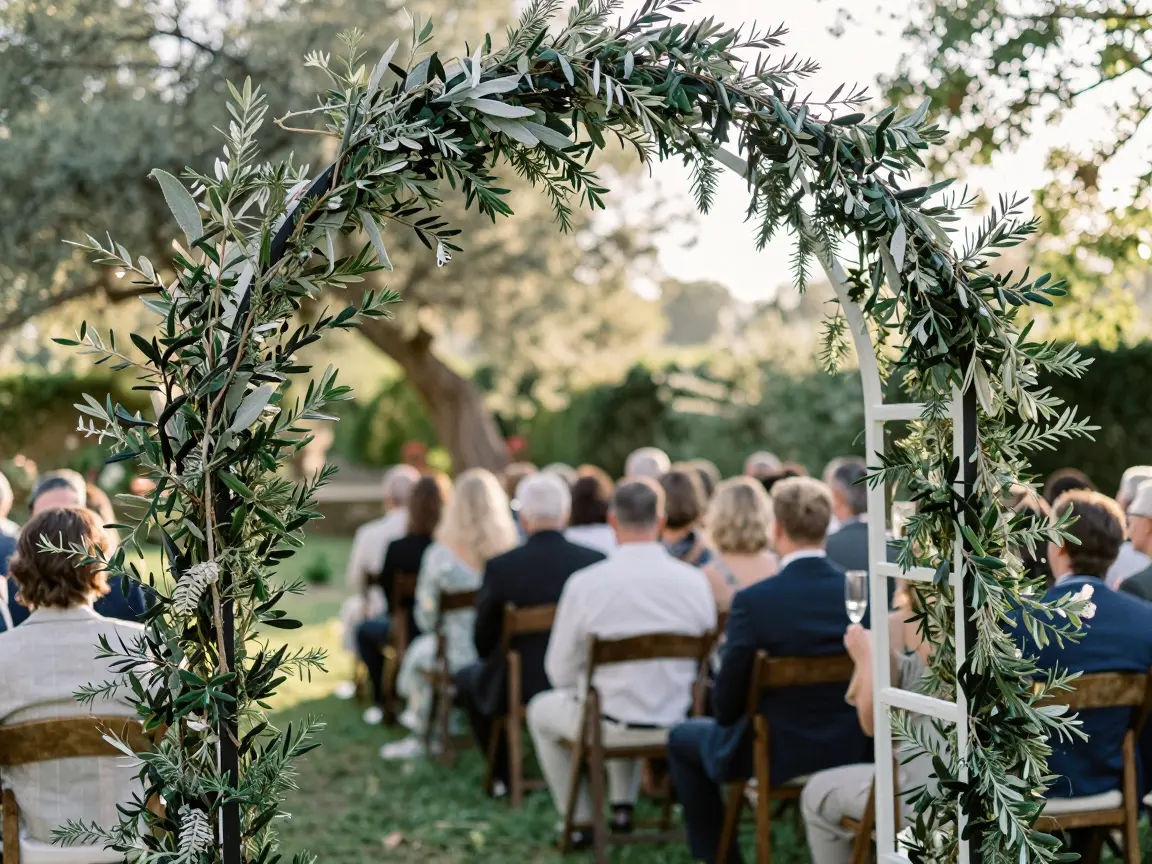
Olive twigs and rosemary sprigs coil around a white metal frame, spilling dark green leaves and silvery sage. The arch swaps roses for olive branches and herbs, cutting flower costs. Olive twigs stay stiff for hours without water, holding shape.
In dry heat, they curl, so build the arch the morning of the ceremony. Store branches cool and mist lightly; then attach to a chicken‑wire grid with hot glue and spray‑paint matte black. The low silhouette works for outdoor weddings of 30‑50 guests and flatters all body types.
Rent a pre‑wired arch for $250‑$350; a DIY kit of loose branches and wire costs $50‑$120.
- durable without water
- aromatic ambiance
- wilts in extreme heat
- needs morning build
- DIY kit: $50‑$120
- Rental: $250‑$350
Heat will curl leaves after a few hours; plan morning setup
The Hanging Origami Crane Screen
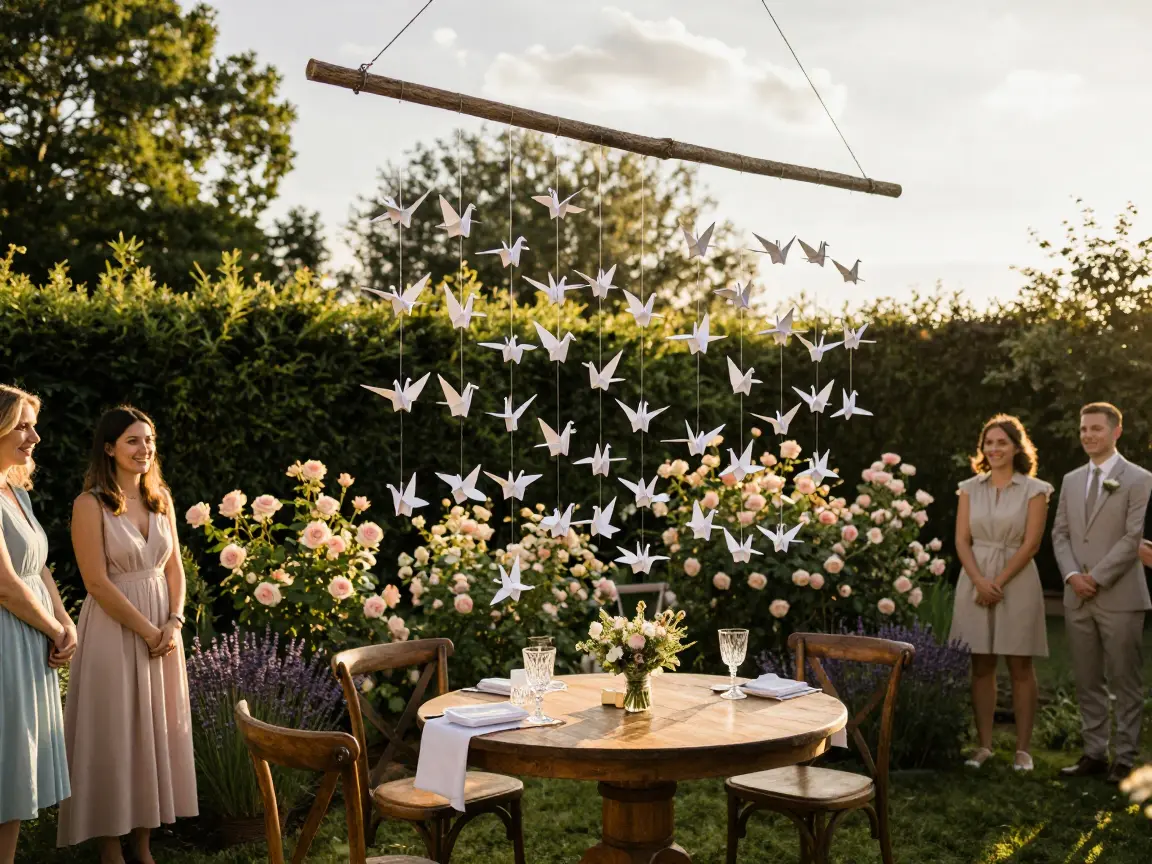
Paper cranes dangle from a single wooden dowel, each wing catching the late‑afternoon light. The look feels airy and romantic, and paper costs pennies per sheet. The downside is folding a few hundred cranes takes dozens of hours, so the project can dominate a wedding prep timeline.
If the time sink is a deal‑breaker, swap the origami for a pre‑painted metal screen that gives a similar silhouette with no folding labor.
Store each strand of monofilament wound around a cardboard sheet; this keeps the line from tangling when you arrive at the venue. The screen works best for an intimate outdoor ceremony of 30 guests or fewer, where the backdrop frames the couple without overwhelming a small space.
A budget version uses a plain dowel, basic monofilament, and printer‑paper cranes, while a splurge option upgrades to a polished bamboo pole and hand‑cut silk cranes that can be reused for future events.
- cheap materials
- airy aesthetic
- many hours folding
- fragile paper
wind each monofilament strand on a cardboard sheet before transport
- Budget: $30 to $60
- Splurge: $200 to $400
Pick Your Perfect Arch
You’ve seen options ranging from the copper pipe’s sleek minimalism to the dramatic neon sign, each with its own stability tricks and budget signals.
When you choose, start by measuring the exact span, test the base with sandbags or planters, and schedule a quick on‑site mock‑up a day before the ceremony.
Avoid the common mistake of overlooking wind direction, and secure any tall elements with hidden weights.
Trust your venue’s terrain and let the arch’s personality match your wedding theme.
Pin this guide to your planning board and share it with a fellow bride so you can reference the stability tips when finalizing the arch design.
Frequently Asked Questions
What are some unique wedding arch ideas?
Unique alternatives to standard floral arches include grounded semi-circles that don’t block scenic backdrops, asymmetrical broken pillars, stacked vintage book pillars for library venues, or utilizing a massive, decorated living tree native to the ceremony space.
How to dress up a wedding arch?
Dress up a simple metal or wooden frame by layering sheer, heavy-weave fabrics like linen or cotton gauze, attaching asymmetrical floral installations using zip ties and chicken wire cages, or incorporating potted statement plants around the base to ground the structure.
How do you keep a wedding arch from blowing over outdoors?
Anchor the frame using heavy steel base plates weighted down with sandbags or concrete pavers, which can be hidden under loose greenery, floral arrangements, or wooden crates. For grass setups, driving heavy-duty tent stakes into the ground and strapping them to the frame legs provides maximum stability.
Can you use faux flowers on a wedding arch?
Yes, high-quality silk flowers are excellent for high-up or structural arch installations because they won’t wilt in direct sunlight and are much lighter than real blooms in wet floral foam. To maintain a natural look, mix real greenery at eye-level with silk flowers further up the frame.


