
12 Practical Wedding Ideas That Prioritize Guest Comfort and Your Budget
12 Practical Wedding Ideas That Prioritize Guest Comfort and Your Budget
When the florist quoted $2,200 for a dozen bouquets and the venue warned that wind would topple any delicate arrangement, the excitement of planning the big day can feel like a budget nightmare.
This list gathers twelve hands‑on ideas that keep guests comfortable without draining the bank account. From potted‑herb centerpieces you can hand out at the end, to family‑style grazing tables that cut staff costs, to a low‑voltage lighting plan that glows without blowing the power bill.
If you’re a couple who wants a memorable celebration that respects both comfort and cash flow, these solutions will help you design a day that feels thoughtful, sustainable, and truly yours.
1. Low-Waste Herb and Potted Plant Centerpieces

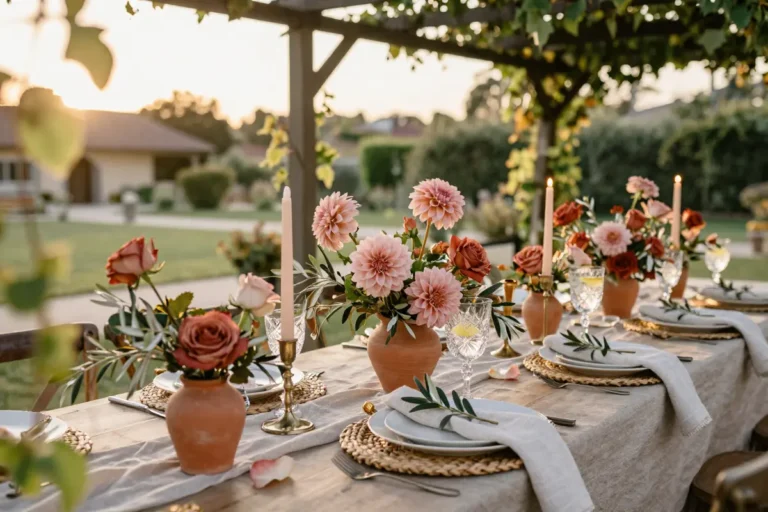
A cluster of rosemary sprigs tucked into rustic tin trays sits atop each table, their silvery needles catching the late‑afternoon light.
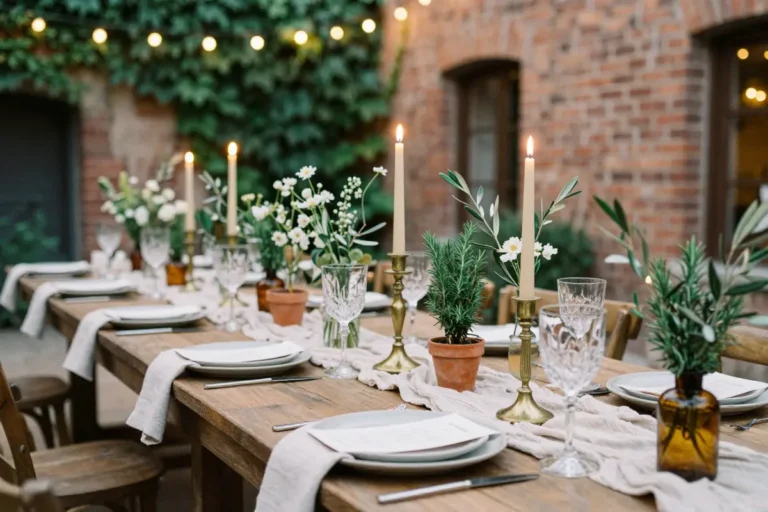
Live potted herbs, rosemary, lavender, or dwarf olive trees, replace cut florals and stay vibrant even when a gentle breeze rolls through an outdoor ceremony.
Guests can lift the pots after the reception, taking home a fragrant reminder instead of a wilted bouquet.
Local nurseries sell 6‑inch pots for $8‑$12 each, letting you keep costs around $20‑$40 per table, roughly 60 % less than the $75‑$150 florist price.
Choose sturdy, shallow saucers to catch loose soil and moisture; without them, even a drizzle can stain rented linens.
A quick tip: line each saucer with a thin layer of peat moss before adding the pot, this absorbs excess water and keeps the table surface dry.
These herbs need minimal upkeep: mist them lightly the night before and keep them out of direct midday sun until the ceremony starts.
After the event, replant the herbs in garden beds or give them to guests, extending their life far beyond the wedding day.
If a tighter budget demands it, swap the tin trays for reclaimed wooden crates; the crates add a rustic vibe while still holding the saucers securely.
Place a small label with the herb name and care instructions for an extra personal touch.
2. Family-Style Grazing Tables in Place of Plated Courses
When guests linger over a multi‑course plated dinner, the timeline stretches, and the catering bill inflates.
Switching to a structured family‑style grazing table cuts service time in half and slashes staff hours because guests serve themselves.
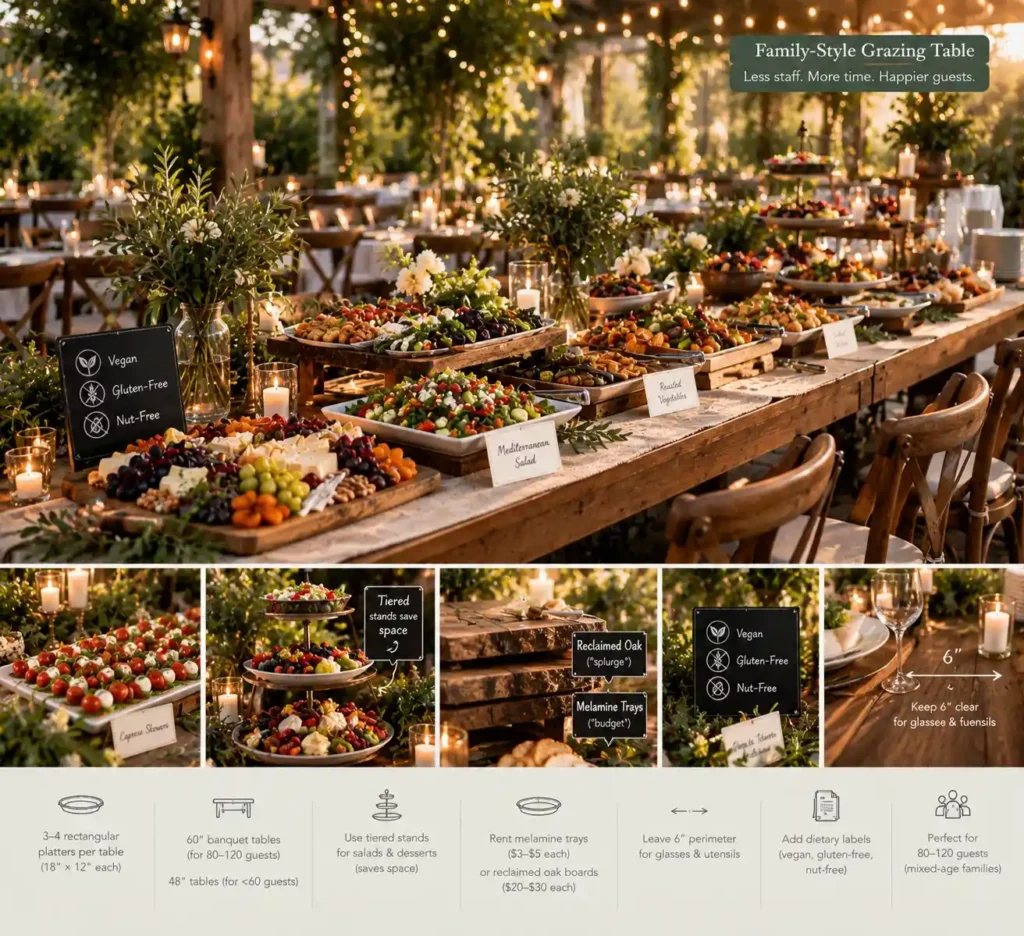
Lay out three to four rectangular platters per table, each 18 × 12 in., and stagger them so elbows can reach without bumping into water pitchers or wine glasses.
This layout keeps the flow smooth and encourages conversation across the table.
The setup shines at weddings of 80-120 people, where mixed‑age families appreciate passing dishes.
Choose 60‑inch banquet tables for a larger crowd; for intimate gatherings under 60 guests, 48‑inch tables prevent excess space.
A quick tip: use tiered stands for salads and desserts; the vertical layers free surface area for centerpieces and keep the table from feeling cramped.
Budget‑friendly option: rent melamine trays at $3‑$5 each. A splurge version uses reclaimed oak boards at $20‑$30 per piece, adding a rustic feel.
Avoid the common mistake of crowding the table; leave at least six inches of clear perimeter for glasses and utensils.
Label each platter with a small card bearing a vegan, gluten‑free, or nut‑free icon. Place a small chalkboard beside each platter with those icons for quick dietary reference.
3. Interactive DIY Beverage Stations with Pre-Batched Bases

Long wait times at the bar often cause guests to cluster and miss parts of the ceremony. A self‑serve station with pre‑batched cocktail and mocktail bases solves that.
Fill three gallon dispensers with a citrus‑gin base, a berry‑vodka mix, and a rosemary‑spritz mocktail.
Keep each container sealed with a pour spout to avoid spills. Add a soda siphon for sparkling water and a separate cooler stocked with fresh lemons, mint sprigs, and frozen berries.
Label every dispenser with the alcohol percentage and place a bright “Zero‑Proof” sign above the non‑alcoholic cooler for kids and designated drivers.
The format cuts down bar queues and eliminates the need for two or three hired bartenders. It also reduces labor costs by letting guests serve themselves.
A downside is the loss of professional portion control; guests may pour larger servings, which can deplete the bases quickly and increase the risk of over‑consumption.
Monitor inventory in real time and set a limit of two pours per guest by placing a small “Two‑drink limit” card at each station.
For a small wedding of 60-80 guests, this setup works smoothly; larger receptions may still require a bartender to oversee the flow.
The dispensers are reusable stainless steel, so rinse them after the event and store them for future use.
A quick tip: line the serving table with a silicone mat to catch drips and keep the surface clean.
If you prefer not to batch yourself, pre‑made cocktail kits from a local liquor store cost about $120‑$150 and include labeled bottles and garnish packs.
Place a clipboard with a QR code linking to the full recipe list beside each station for easy reference.
4. A ‘Pocket-Sized’ Local Flower Stand Guest Favor
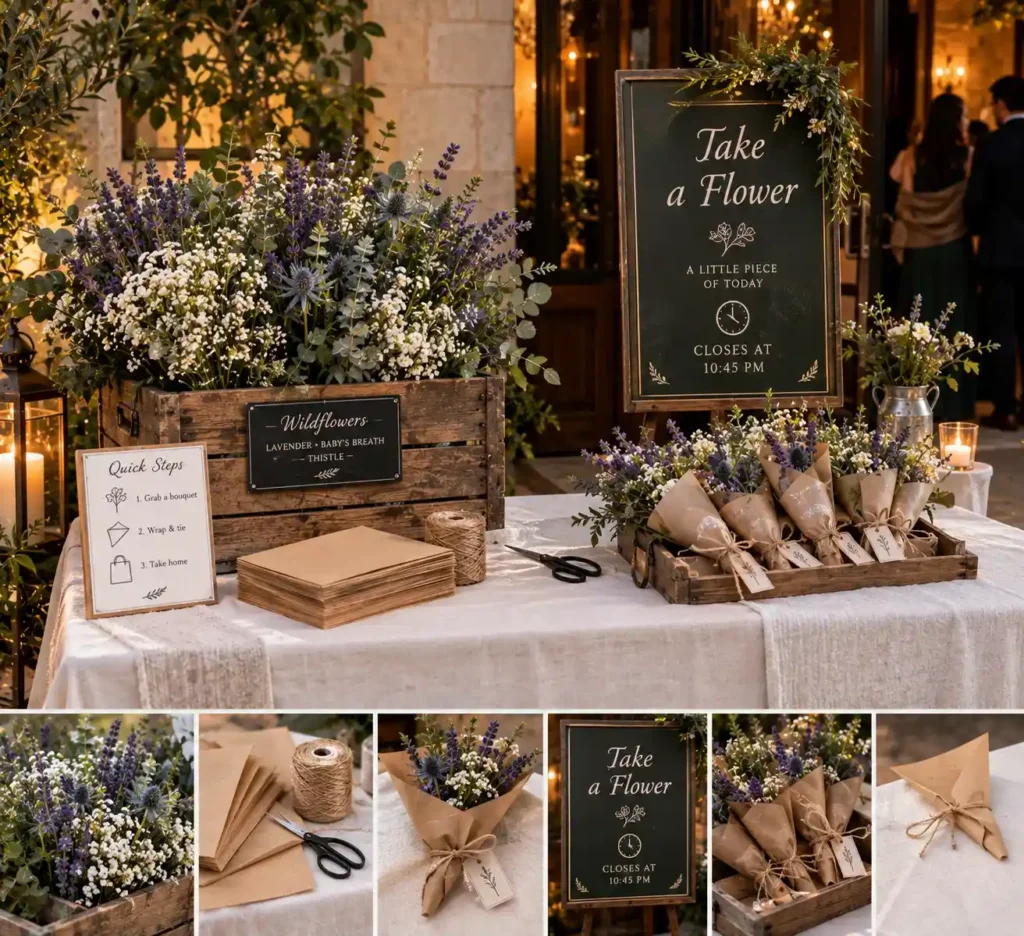
Set the flower stand beside the reception exit, where guests linger to collect coats and say goodbye.
Lay a simple table covered in a recycled white linen runner; the runner protects the surface and can be washed for future events.
Arrange bulk‑sourced wildflowers, such as lavender, baby’s breath, and thistle, in a shallow wooden crate, keeping stems trimmed to twelve inches for easy handling.
Provide brown kraft paper squares, a roll of natural twine, and a pair of scissors so each guest can wrap a pocket‑sized bouquet in five minutes.
The station repurposes ceremony florals that would otherwise be discarded, turning waste into a keepsake.
A volunteer or hired attendant should open the stand five minutes before the last dance and close it promptly at the designated time to prevent a traffic jam at the exit.
For a splurge version, order custom‑printed tissue paper in the wedding’s pastel palette; the budget‑friendly swap is the kraft paper and twine, which costs under $30 for a 100‑guest wedding. The paper and twine can be composted after the night, minimizing post‑event waste.
Quick tip: pre‑fold the kraft squares into a triangle and tie a short loop of twine around each, so guests only need to add the flowers before leaving.
Place a small “Take” sign with a clock indicating the closing time to keep the flow smooth.
5. Cozy, High-Functioning Lounge Vignettes Using Thrifted Furniture
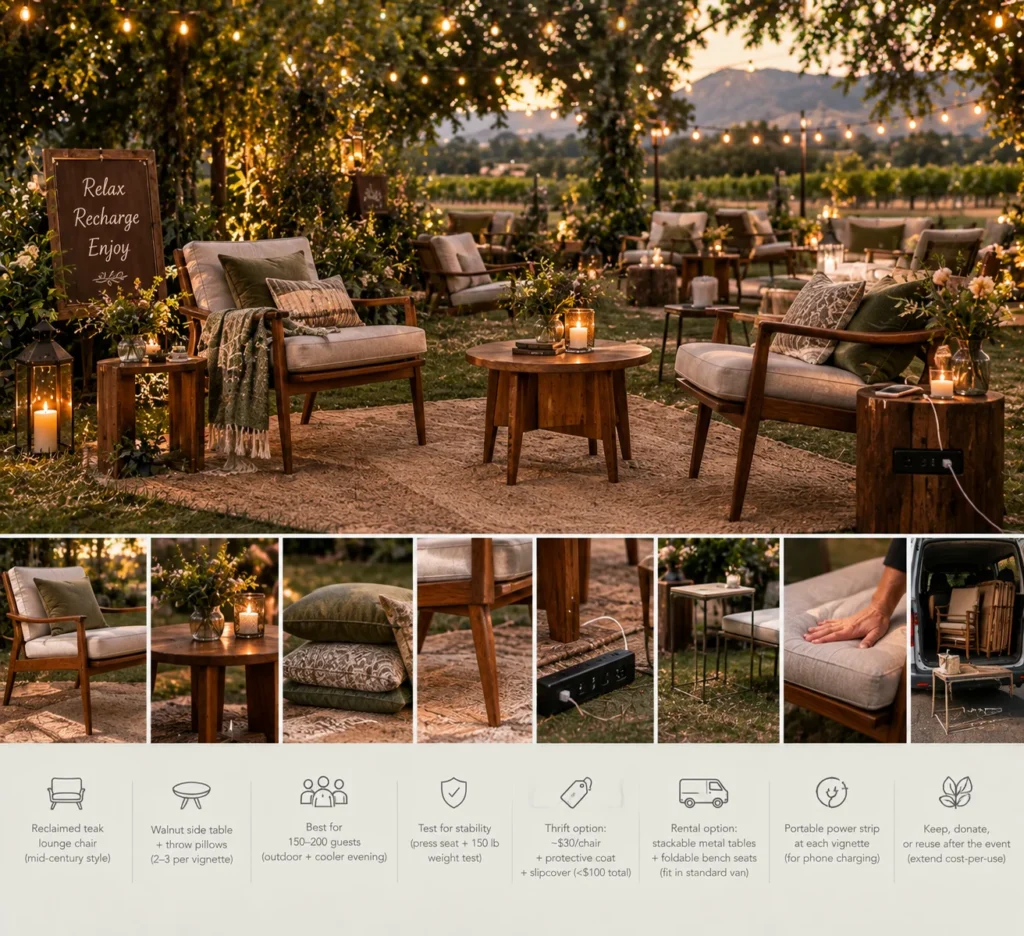
A reclaimed teak mid‑century lounge chair with tapered legs anchors each vignette. Pair it with a sturdy walnut side table and a small stack of soft throw pillows.
The low profile invites older relatives and introverted guests to step away from the noisy dance floor.
Place two to three chairs per corner, leaving a clear path for servers.
Test each chair by pressing down on the seat and checking for wobble; a quick weight test, standing on the chair with a 150‑lb bag, confirms capacity.
Avoid the common mistake of buying only for looks; many vintage pieces lack modern joint reinforcement and can collapse under a single guest.
For a budget‑friendly version, hunt thrift stores for similar chairs priced around $30 each, then add a clear acrylic protective coat and a new slipcover.
If transporting heavy wood feels overwhelming, rent stackable metal side tables and upholstered bench seats that fold flat and fit in a standard van.
This setup shines at weddings with 150‑200 guests, especially when the ceremony is outdoors and the evening cools.
A splurge option includes a professional reupholster at $120 per chair, while the thrift route stays under $100 total per vignette.
After the day, the pieces can be donated or kept for future events, extending their cost‑per‑use value.
Add a portable floor‑level power strip to each vignette for guests to charge phones while they relax.
6. An Audio Guestbook via a Vintage Rotary Phone
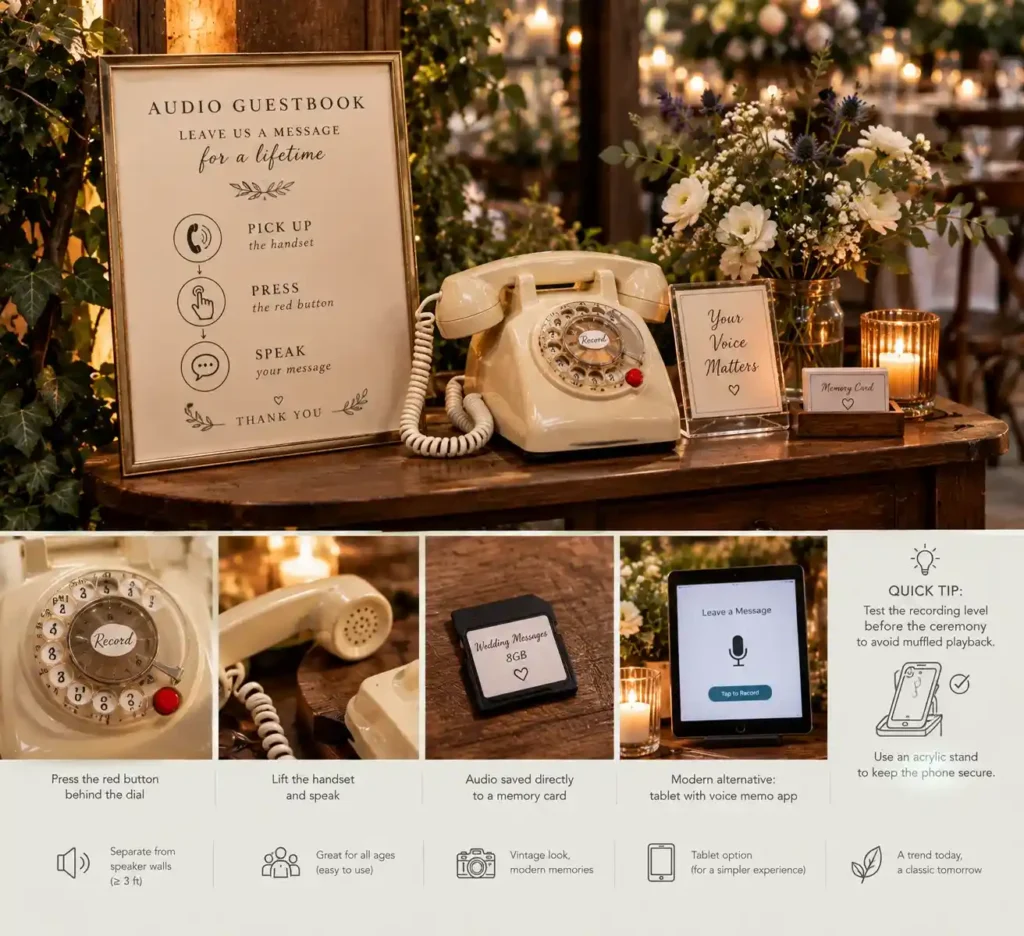
A refurbished 1950s rotary phone sits on a small walnut table beside the reception desk. Guests lift the handset, press the discreet red button hidden behind the dial, and speak a brief message that records directly onto an attached memory card.
The voice captures laughter, accents, and spontaneous emotions that a pen‑and‑paper book never can.
Position the station at least three feet from any speaker wall; otherwise background music will drown out the recordings.
Older or less tech‑savvy guests may hesitate, so a large, bold sign with a simple “Pick up → Press → Speak” diagram is essential.
If the rotary feels too unfamiliar, a modern tablet with a one‑tap voice memo app offers the same audio vibe without the learning curve.
This vintage‑tech element is hot in current wedding décor circles, though its novelty may fade as trends shift toward minimalist digital stations.
A quick tip: test the recording level with a friend before the ceremony to avoid muffled playback later. Secure the phone with a clear acrylic stand to keep it upright throughout the reception.
7. Instax Photo Wall with a Pre-Labeled Album
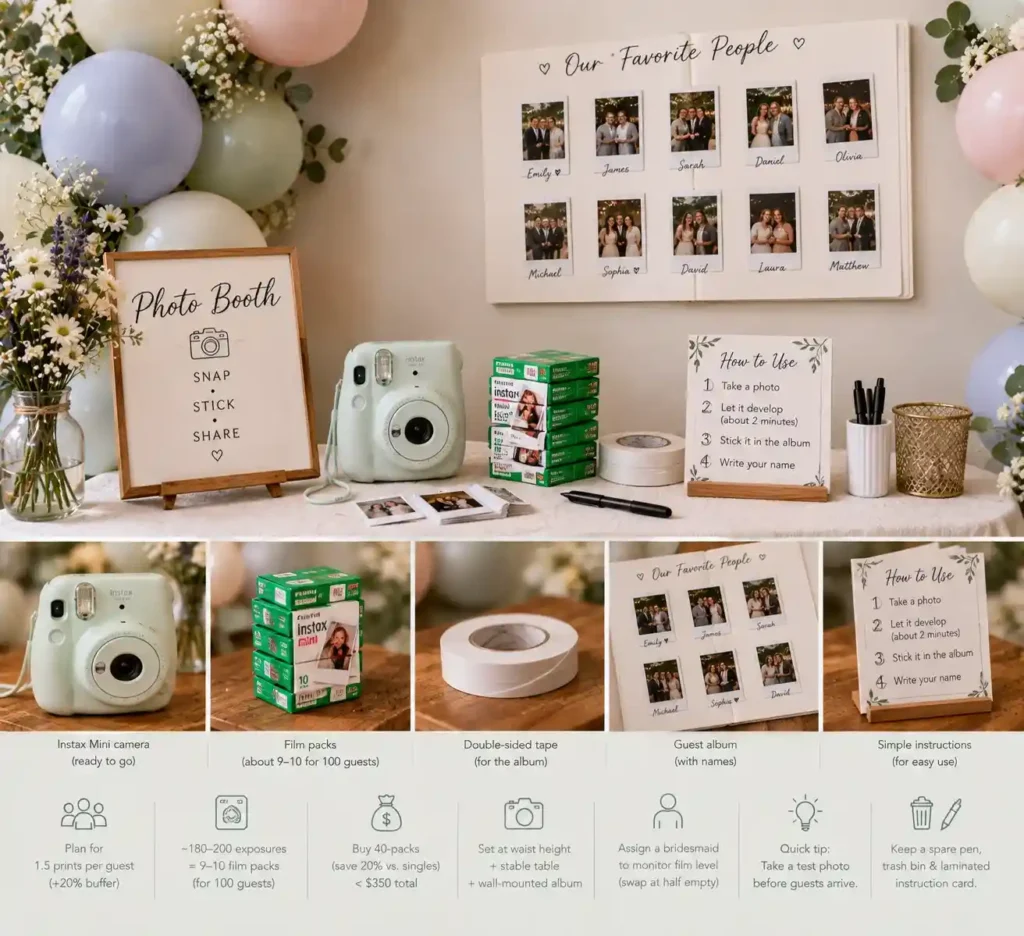
A crisp white backdrop framed by pastel balloons holds the Instax Mini camera, a stack of fresh film, and a roll of double‑sided tape for the album.
The solid wall prevents busy patterns from interfering with flash, keeping every picture clear.
Plan for 1.5 prints per guest, then add a 20 % buffer for test shots and misfires; for 100 guests that means about 180‑200 exposures, which translates to roughly 9‑10 film packs.
Buying 40-packs saves 20 % compared with singles, keeping the total under $350.
Set the camera on a sturdy table at waist height, attach the album to the wall with tape, and label each page with the guest’s name in fine‑tip pen.
Assign a bridesmaid to watch the film level; when the cartridge is half empty, she swaps in a spare pack without stopping the flow.
Quick tip: snap a test photo before the first guest arrives to confirm lighting and focus. The DIY approach costs far less than hiring a professional photo booth, which can start at $600.
Keep a spare pen, a small trash bin, and a laminated instruction card nearby for smooth operation.
8. Regional Bakery Dessert Tables Instead of a Single Massive Cake
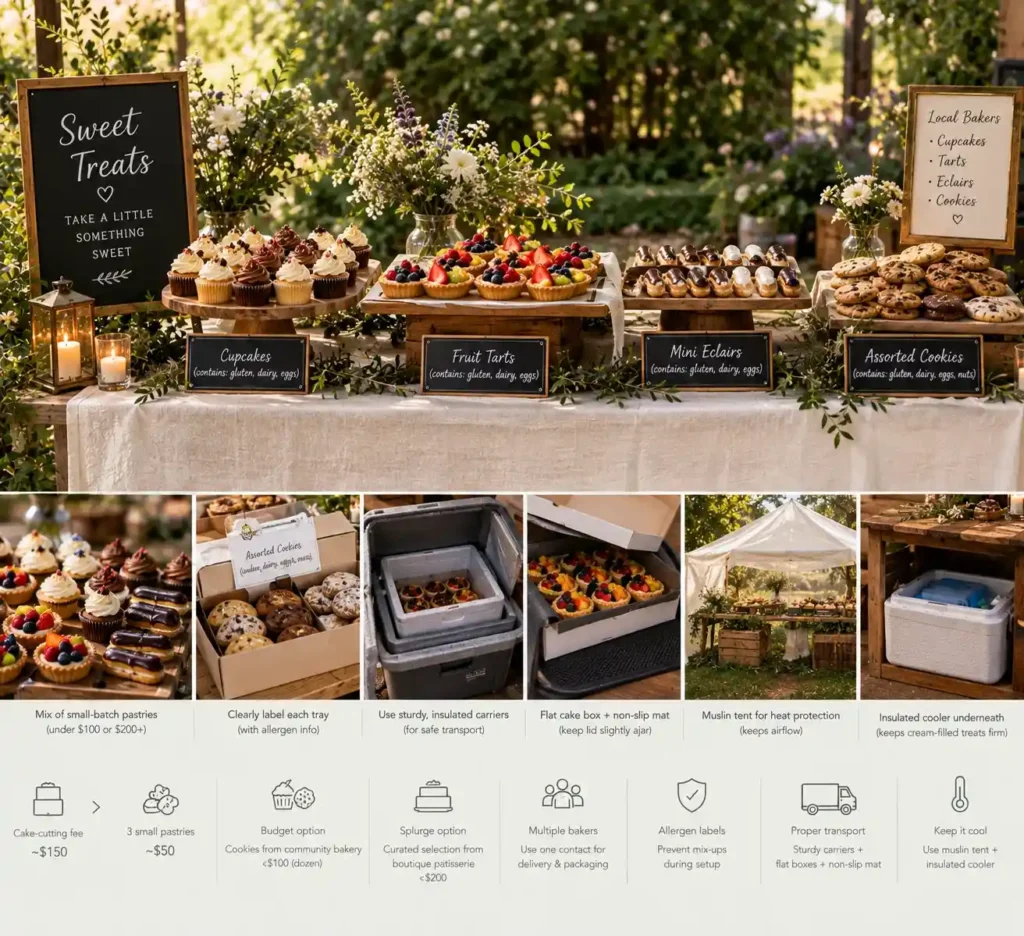
A $150 cake‑cutting fee often exceeds the price of three small‑batch pastries from a nearby bakery. Swapping a towering tiered cake for a self‑serve dessert table lets guests sample cupcakes, fruit tarts, and mini eclairs while you avoid the ceremonial slice.
The spread feels informal, cuts down on wait time, and reduces waste because guests take only what they like.
Budget‑friendly options include ordering a dozen assorted cookies from a community bakery for under $100, while a boutique patisserie may charge $200 for a curated selection of gourmet desserts.
Coordinating two or three specialty bakers means you’ll need a single point of contact to align delivery windows and confirm each shop’s packaging requirements.
Ask each baker to label trays with the dessert name and any allergen info; this prevents mix‑ups during setup.
Transport delicate items in sturdy, insulated carriers. For tarts, use a flat cake box with a non‑slip mat and keep the lid slightly ajar to avoid condensation.
In venues without air conditioning, set the dessert table on a low‑profile wooden crate and cover the pastries with a breathable muslin tent to shield them from heat while allowing airflow.
Finally, reserve a small insulated cooler beneath the table to keep cream‑filled treats firm if the reception extends beyond two hours.
9. A Circular ‘In-the-Round’ Ceremony Seating Layout

White folding chairs form a perfect circle around the couple, leaving an 8‑foot open space for the ceremony.
The layout makes every guest feel included and gives an unobstructed view of the vows. To plan it, measure a 30‑foot diameter on the floor and mark the perimeter with painter’s tape.
Place chairs shoulder‑to‑shoulder along the line, keeping a 4‑foot aisle on each side for the entrance and exit.
Use a tape measure to confirm the aisle width; a common mistake is cutting it to 2 feet, which forces guests to shuffle when the couple walks in.
Audio needs special care: set two portable speakers on tripod stands 6 feet behind the couple, angled toward the circle, rather than hanging a single speaker at the back where it would block sightlines.
Because the circle surrounds the couple, at least one guest will be staring at the backs of the bride and groom for the entire ceremony, a trade‑off to weigh against the intimacy.
If your venue is narrow or you expect more than 80 guests, a semi‑circular “U” layout offers similar closeness without the space demand.
This arrangement works best for intimate weddings of 50‑80 people who want an egalitarian feel and have a rectangular hall that can accommodate the 30‑foot circle.
Renting basic white chairs saves $2‑$4 each compared with specialty décor chairs, keeping the budget friendly.
Secure the aisle markers with painter’s tape so the bridal party can walk straight without shifting chairs on the day.
10. Late-Night Comfort Food Trucks for Post-Dancing Fuel

At 10 p.m., when the dance floor eases, the food truck rolls up beside the venue’s loading dock and opens a side window.
Guests can walk out for a quick bite without missing the last set. Book the truck to arrive 45 minutes before the final hour so staff can set up a power strip and test the generator on site.
Verify the venue’s external catering permit and ask the vendor for a copy; most cities require a health inspection sticker visible on the truck.
Set up a single, clearly marked line with rope or a portable stanchion.
A volunteer with a handheld timer can keep the line under five minutes by handing out pre‑sliced pizza or taco portions on small plates.
Offer napkins and bottled water at the end of the line to avoid guests queuing back inside.
Be aware the truck will draw people outside, which can thin the dance floor and pause the indoor vibe.
To limit disruption, schedule the food service for the last 30 minutes and announce the exact start time on the reception program.
Quick tip: request a pre‑cut pizza tray so the crew can hand out slices without using a cutting board, keeping service swift.
Ask the truck to provide a backup battery pack in case the venue’s outlet trips.
11. Low-Voltage Warm Bistro Lighting and Amber LED Candles

A string of warm‑glowing bistro lights draped across the garden arch creates a soft canopy of amber. Pair the strings with battery‑operated amber LED candles that mimic real wax flicker.
Choose 2700K bulbs for the bistro line; the warm color temperature blends with the candle glow, while cool‑toned 4000K lights feel sterile.
Most venues now ban open flames because of fire‑safety regulations, insurance rules, and historic preservation concerns, so LED candles are venue‑approved, last the entire night, and stay consistently bright outdoors.
To build the look, start with a commercial‑grade outdoor bistro string (100 ft runs cost $40‑$60).
Hang the wire along pergolas, table edges, or a ceremony backdrop using zip ties or small hooks. Clip LED candles to the wire with miniature zip ties, spacing them every 12‑18 in.
Arrange 100‑500 candles depending on venue size; a 200‑guest barn typically needs around 300 for even coverage.
Faux‑flame candles require meticulous setup, and buying high‑quality LED options in bulk still carries a notable upfront cost compared to simple open flame wax candles.
After the event, store the candles in their original boxes to protect the batteries and extend their lifespan.
Quick tip: test each battery pack for at least two hours before the ceremony to avoid dimming mid‑reception.
If DIY feels overwhelming, a lighting vendor can install the system for a flat fee, but the DIY route saves on labor and lets you reuse the components for future events.
Label each battery pack with the table number so you can quickly replace any dimming units during the reception.
12. A Preparedness Station Tailored to the Outdoor Elements
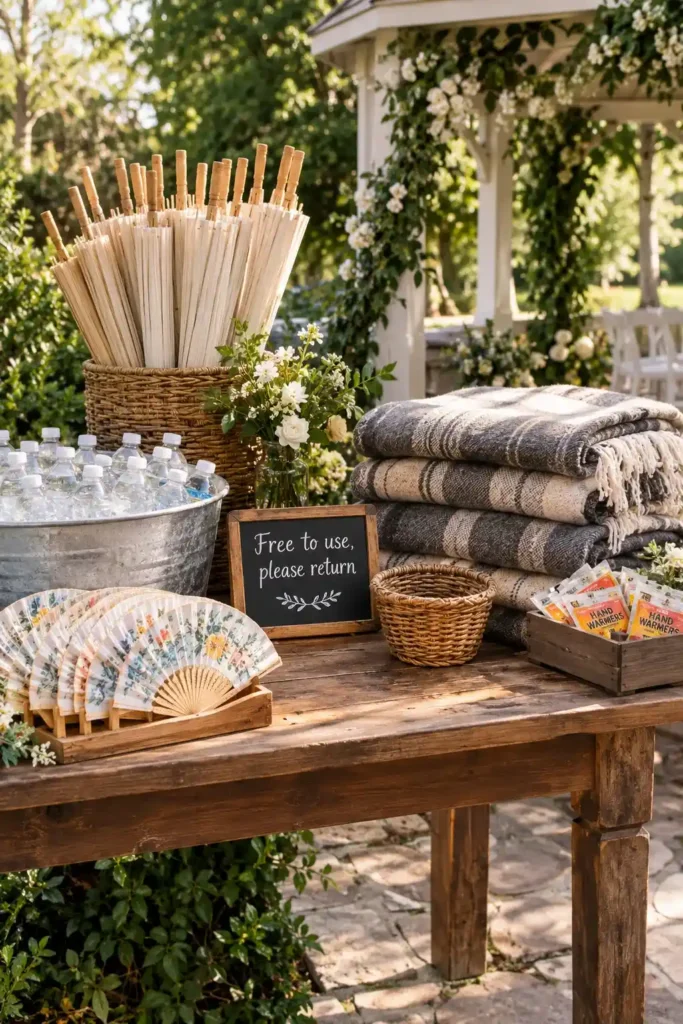
At the garden ceremony, a wooden table tucked beside the gazebo holds a stack of bamboo parasols and a bin of chilled water bottles.
Add a row of hand‑painted wooden fans for summer heat, and swap them for wool‑blend blankets and disposable hand warmers when the evening turns crisp.
Guests notice the station immediately; they linger to grab a fan or drape a blanket, and later comment that the gesture made the outdoor setting feel welcoming.
Buy blankets in bulk from a wholesale retailer, about $10 each, or rent a set from a party‑supply company for $2 per piece.
Parasols and fans can be sourced from a local craft market for $15, $20 each; buying a dozen covers the whole party.
Attach a chalkboard label that reads “Free to use, please return” and place a small wicker basket nearby for items that have been taken.
This simple cue prevents loss and keeps the area tidy.
The setup works best for medium‑sized weddings of 80-120 guests, especially when older relatives or guests with mobility concerns are expected.
A splurge version includes monogrammed blankets and custom‑branded fans; a budget version uses plain blankets and simple wooden fans.
Remember to wipe fans with a damp cloth after use and machine‑wash blankets on a gentle cycle, then air‑dry them for next‑year reuse.
Weather is notoriously unpredictable, so allocate no more than 5 % of the total budget to this station to avoid overspending on items that may never be needed.
As a quick tip, position the station near the reception entrance so guests can grab essentials before they settle into seats.
Your Next Comfort‑First Wedding Move
Pick the idea that resonates most, source the basics this weekend, and test the setup with a small group of friends before the big day. Small actions add up to big comfort, and you’ll feel proud watching guests relax and enjoy.
Save these tips to your planning board, share them with anyone juggling a wedding budget, and let the day unfold exactly the way you imagined.
Pin this list for easy reference when you’re ready to order supplies.
Frequently Asked Questions
What is the most cost-effective way to decorate a wedding venue?
Focus your budget on high-impact lighting, like warm bistro strings and amber LED candles, which instantly alter the room’s mood. Pair this with potted green herbs or plants instead of cut floral arrangements, as they cost significantly less and can be reused after the event.
How can we make our wedding ceremony feel more personal?
Opt for a ceremony layout ‘in the round,’ placing your altar in the center of a circular seating arrangement so guests feel closely connected. Incorporate an audio guestbook where family and friends can leave real-time voice messages on a vintage telephone.
What wedding details do guests actually notice and care about?
Guests care primarily about temperature comfort, quick access to food, and clear sound quality during speeches. Elaborate, expensive favors and complex tabletop decorations are rarely noticed, while long dinner lines and cold venues are always remembered.
How do you avoid long lines at a wedding bar?
Set up a self-serve beverage station featuring pre-batched signature drink bases, sodas, and garnishes alongside your main bar. This allows guests who want a quick, simple drink to serve themselves, instantly cutting bar wait times in half.